The photo on the left is my inspiration pin, and the photo on the right is my completed project!
Details about the plate hanging part of the process can be found here. If you want a overview of the entire project with less details, click here.
I am shocked at how the images look like the same color! I do not know exactly what color the piano is. Addicted 2 Decorating lists the suggested paint color as Behr's Teal Bayou (530D-6).
{Home Depot, Teal Bayou}
I wanted something a little more greenish teal, so I decided to use Behr's Teal Zeal.
{Home Depot, Teal Zeal}
The results were not quite right. I moved the cabinet into the dining room to check out the color in the room that it would reside and decided it was just a little too light.
The frame on top is painted in Valspar's Exotic Sea. I had a sample of this color that I was able to get for 50 cents due to some of the white base had leaked when shaken.
{Lowes, Exotic Sea}
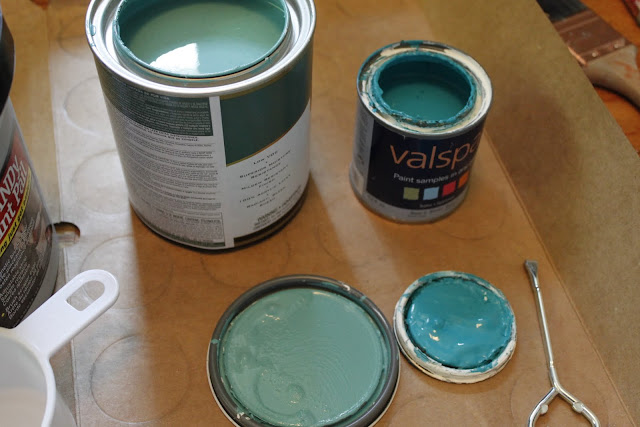
So I decided to mix a 1:1 ratio of Exotic Sea and Teal Zeal for a combined color of Exotic Zeal! {Obviously I am making that up, sounds very Emily Henderson style diagnostic like though}
Teal Zeal is on the left and Exotic Sea on the right in the above and below photos.
The paint stick is the combo. It is definitely more on the Exotic Sea side due to the darker nature of the color and since I did a 1:1 ratio. I am happy with the results. Before painting, I scrapped off old paint completed off the top and sanded to rough up the rest of the cabinet.
I was not intending for it to be so close to the piano color, it was kinda a happy accident. The inside and the shelves {except for the faces} are painted black. So overall the painting part was successful. I tackled this part of the project first so the paint would have time to cure a little before loading and accessorizing. I went ahead and used the hardware that was on the cabinet before but have been looking at different hinge and knob options. I think a black and white patterned knob would be a cool look.
The back of the cabinet was painted gray for the previous red paint makeover. I wanted to keep it gray but add a faux bois pattern to it. I have been dying to do something faux bois for a while.
I purchased the Martha Stewart faux grain wood rocker tool for just under $6 at Home Depot. I had some white acrylic craft paint and extender medium from another project so I whipped up Martha's glazing recipe of 1:1:2= 1 part paint, 1 part extender medium, and 2 parts water from her How-To. I watched the video from the how-to and got right to work!
The Martha glazing recipe was very watery, and I did not have anymore white craft paint so I went ahead and used some ultra white wall paint to thicken it up a bit. As per the video, I worked in small sections.
The board was stapled to the back of the cabinet when I purchased it from an antique mall, and those marks were proving to cause me some issues when dragging and rocking the wood-grain tool. A few sections I redid many times.
Here are the finished results and a few detail shots of the grain.
The board was dry to the touch after an hour. After a day and a half, it was reassembled and moved into the dining room.
You cannot really see the faux bois in the photos but the teal was meant to be the focus anyway. Well that is half of the project. Painting provided lots of wait time which was great to use for the plate part of the project!


No comments:
Post a Comment